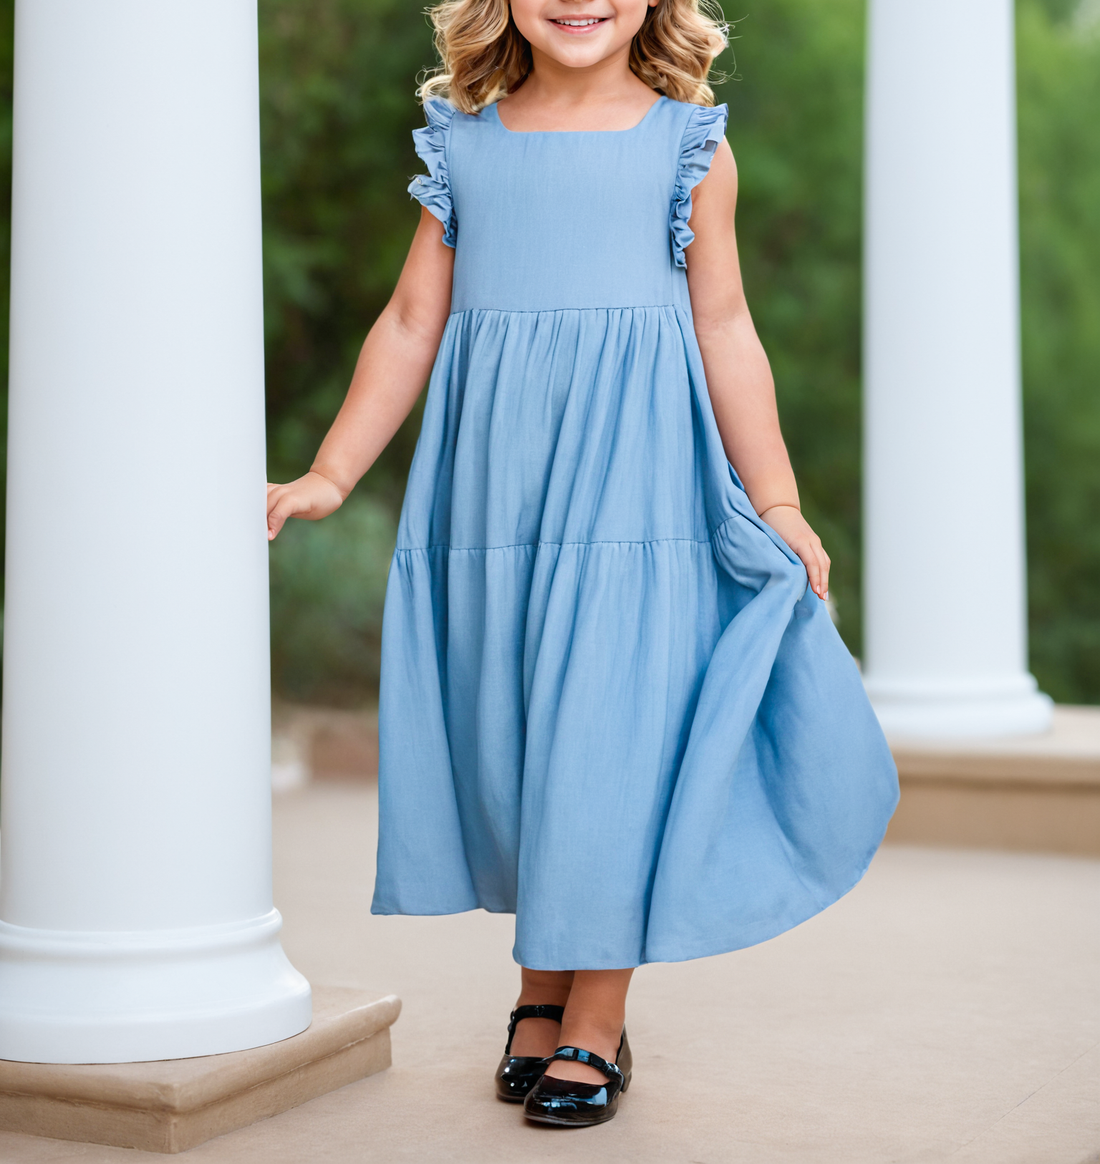
Girls Square Neck Ruffled Sleeve Maxi Dress - Free PDF Sewing Pattern
Are you looking to create a stunning outfit for your little one? Dive into the world of sewing with the Girls Square Neck Ruffled Sleeve Maxi Dress Sewing Pattern. This free sewing pattern offers a unique design that is both stylish and comfortable for any occasion.

The pattern includes 4 sizes for you to choose from:
- 4Y to 7Y
The digital download PDF sewing pattern includes a layer option to only select your size or multiple sizes all at once. The free sewing pattern is created so you can print at home or through a printshop.

The free sewing pattern comes with 3 PDF files:
- A4
- US Letter
- A0
Seam allowance and hem measurement is already indicated on the pattern.
The free dress pdf pattern is available to download at the bottom of the webpage. This is a digital product and not a physical item that will be shipped to you.
Hope you enjoy the free Girls Square Neck Ruffled Sleeve Maxi Dress sewing pattern!
What do I need to start sewing?
Sewing machine
Overlock/Serger
Pattern printout
Sewing thread
Measuring tape
Water erasable pen/Chalks
Scissors
Ruler
Pins
¼” or 0.6cm width elastic band
2 yard x 60” width crinkle linen
Fabric Recommendations: crepe, viscose, rayon challis, linen, polyester, cotton, crepe de chine
Printing Instructions

Let’s print out the free kids sewing pattern!
The sewing pattern comes with 3 different printing options! The US Letter and A4 print is a tile version PDF that you can print out at home. The A0 version is used by a printshop to print on a single sheet of paper and saves time taping the separate pages together.
Additionally, you can use view mode to only select/print the size you are working on. Each pattern file is designed with layers of different sizes. There is an option to print only your size or all sizes based on your preference. Open the file in Adobe Acrobat and keep in legend layer.
If you print at home, then you need to trim each sheet by cutting off the top and excess margin. Tape each page together by row, and then attach the rows together. Use the diamond marks to align everything!
Always make sure to print on 100% scale.
(Do not ‘fit to page’ or reduce the size!)
There is a test square on the first page of the pattern.
Use as a scale to check if the dimensions are 5x5cm and/or 2x2”.
A4

US Letter

Size Chart


Patterns

Square neck ruffled sleeve maxi dress pattern pieces include:
A- Front Top, cut 1 on folded fabric
B- Front Side Top, cut 2
C- Front Top Facing, cut 1 on folded fabric
D- Front Middle Skirt, cut 1 on folded fabric
E- Front Bottom Skirt, cut 1 on folded fabric
F- Ruffle, cut 2
G- Back Top, cut 2
H- Back Side Top, cut 2
I- Back Top Facing, cut 2
J- Back Middle Skirt, cut 2
K- Back Bottom Skirt, cut 2
L- Tie, cut 2
⅜” or 1cm seam allowance is already included unless indicated on the pattern or instruction book.

Step by Step Instruction
Step 1- Merrow stitch the cut edge of the Ruffle (F) panels. Increase the stitch length to 4.0 to 5.0 on your machine and single stitch ¼” or 0.6cm along the top of the Ruffle (F) pieces. Manually hand gather and set aside.
Step 2- On the wrong side of Front Top Facing (C) and Back Top Facing (I), apply a fusible interfacing with light steam iron. Ensure to fuse on the wrong side of one Front Top Facing (C) and Back Top Facing (I) piece. Overlock stitch along the hem of Front Top Facing (C) and Back Top Facing (I) pieces separately.
Step 3- Place Front Top Facing (C) and Front Top (A) right sides together. Sew around the square neckline with ⅜” or 1cm straight stitch. Clip the corner, then open up the Front Top Facing (C) and edge topstitch around the neckline. Flip the Front Top Facing (C) to the wrong side of Front Top (A) and press.
Step 4- Place Back Top Facing (I) and Back Top (G) right sides together. Sew around the square neckline with ⅜” or 1cm straight stitch. Clip the corner, then open up the Back Top Facing (I) and edge topstitch around the neckline. Flip the Back Top Facing (I) to the wrong side of Back Top (G) and press.
Step 5- Place Front Top (A) and Back Top (G) right sides together. Close the shoulder seam with ⅜” or 1cm straight stitch. Overlock stitch the seam allowance and press seam toward the Back Top (G).
Step 6- Place Front Side Top (B) and Back Side Top (H) right sides together. Close the shoulder and side seams with ⅜” or 1cm straight stitch. Overlock stitch the seam allowance and press seam toward the Back Side Top (H).
Step 7- Place the Ruffle (F) on the right side of Front and Back Top (A&G). Cover with right side of Front and Back Side Top (B&H). Ensure the gathering of Ruffle (F) is evenly distributed front to back. Straight stitch along the princess seam ⅜” or 1cm width. Overlock stitch the seam allowance and press seam toward the Front and Back Side Top (B&H).
Step 8- Overlock stitch the armhole on Front and Back Side Top (B&H). Fold the seam allowance toward the wrong side of fabric to ¼” or 0.6cm topstitch.
Step 9- Increase the stitch length to 4.0 or 5.0 on your machine. Double stitch ¼” or 0.6cm (or ¼” or 0.6cm apart from each other) around the top of the Front Middle Skirt (D). Manually hand gather the top opening and set aside.
Step 10- Place Back Middle Skirt (J) right side together and close the center back seam with ⅜” or 1cm straight stitch. Overlock stitch the seam allowance and press seam toward the side.
Step 11- Mark 3 equal distances on the elastic to evenly distribute the gathering around the back waist opening. Place the ¼” or 0.6cm width elastic on the wrong side of the back waist opening of Back Middle Skirt (J). Match the 3 marked points to center back and side seams. Stretch as you sew overlock stitch around the back waist opening. Fold the elastic toward the wrong side of the fabric and ¼” or 0.6cm width straight stitch on the right side around the back waist opening of the Back Middle Skirt (J).
Step 12- Place Front Middle Skirt (D) and Back Middle Skirt (J) right side together and close the side seams with ⅜” or 1cm straight stitch. Overlock stitch the seam allowance and press seam toward the Back Middle Skirt (J).
Step 13- Place Back Bottom Skirt (K) right side together and close the center back seam with ⅜” or 1cm straight stitch. Overlock stitch the seam allowance and press seam toward the side.
Step 14- Place Front Bottom Skirt (E) and Back Bottom Skirt (K) right side together and close side seams with ⅜” or 1cm straight stitch. Overlock stitch the seam allowance and press seam toward the Back Bottom Skirt (K).
Step 15- Attach the Front and Back Middle Skirt (D&J) to Front and Back Bottom Skirt (E&K) by matching the side seams, center front and back notches to pin. Adjust the gathering so it is evenly distributed between the 4 parts. Sew ⅜” or 1cm width stitching and overlock stitch to secure. Lightly press the seam facing bottom hem.
Step 16- Attach the Front Skirt (D&E) to the front waist opening of Front Top (A&B) with ⅜” or 1cm straight stitch. Overlock stitch the seam allowance and press seam toward the Front Skirt (D&E).
Step 17- Fold the Tie (L) right side together and sew along one of the short ends to the long edge with ⅜” or 1cm straight stitch. Trim the seam allowance and clip the corner. Flip the Tie (L) right side out and press. Repeat the process to complete another Tie (L).
Step 18- Place the Tie (L) on the right side of Back Top (G) and join the pieces with ⅜” or 1cm straight stitch. Overlock stitch the seam allowance and press seam toward the Back Top (G). Repeat the process to join another Tie (L) piece to the other side.
Step 19- Double fold the hem of the Skirt (D&E&J&K) ¼” or 0.6cm and topstitch. Gently press all around and enjoy the girls square neck ruffled sleeve maxi dress!
Download the Free PDF Sewing Pattern
To download just click on the link below and choose “Save link as”. The free sewing pattern PDF file will be downloaded to your device. We do NOT require any email address to download our free pdf patterns.
Girls Square Neck Ruffled Sleeve Maxi Dress.zip
Happy sewing! And don’t forget to share your project on our Facebook page: Patterns For Less or tag us on Instagram #patternsforless, We are excited to see the clothing you make!